Table of Contents
Introduction
SmartKit AI integrates powerful AI-driven text and image generation tools directly into your WordPress dashboard. This plugin allows you to draft and enhance content with AI, create images, build reusable prompt templates, run automated batch jobs, and enforce cost controls for AI usage. With SmartKit AI, you can connect to popular AI providers (OpenAI or Google AI) to generate content and images right from your site’s admin interface, helping streamline your writing and media creation workflows.
Installation and Activation
Requirements: Ensure your site meets the minimum requirements – WordPress 6.2 or later and PHP 7.4 or higher. Your server should also have internet access (outbound HTTPS) so it can reach the AI provider APIs for processing requests.
Installation Steps:
Method 1, Upload in WordPress
Plugins → Add Plugin → Upload Plugin
Select smartkit-ai.zip → Install Now → Activate
Method 2, Upload via File Manager or FTP
Upload and extract the plugin into:/wp-content/plugins/smartkit-ai/
After installation finishes, click Activate Plugin.
Once activated, you’re ready to configure the AI settings and start using the plugin’s features.
Connecting AI Providers (OpenAI and Google AI)
Before generating any content, you need to connect an AI provider: OpenAI or Google AI Studio. SmartKit AI supports both providers and lets you choose which to use for text versus image generation.
Get an API key
OpenAI: Create an API key in your OpenAI dashboard:
https://platform.openai.com/api-keys
- Google AI Studio: Create an API key in Google AI Studio:
https://aistudio.google.com/api-keys
Enter API Keys in Settings: In your WordPress admin, go to SmartKit AI → Settings → Providers. Enter the API key for OpenAI and/or Google AI Studio in the provided fields. Save your changes.
After connecting your providers, you’re all set to generate AI content. The plugin will use your configured AI services for all its features.
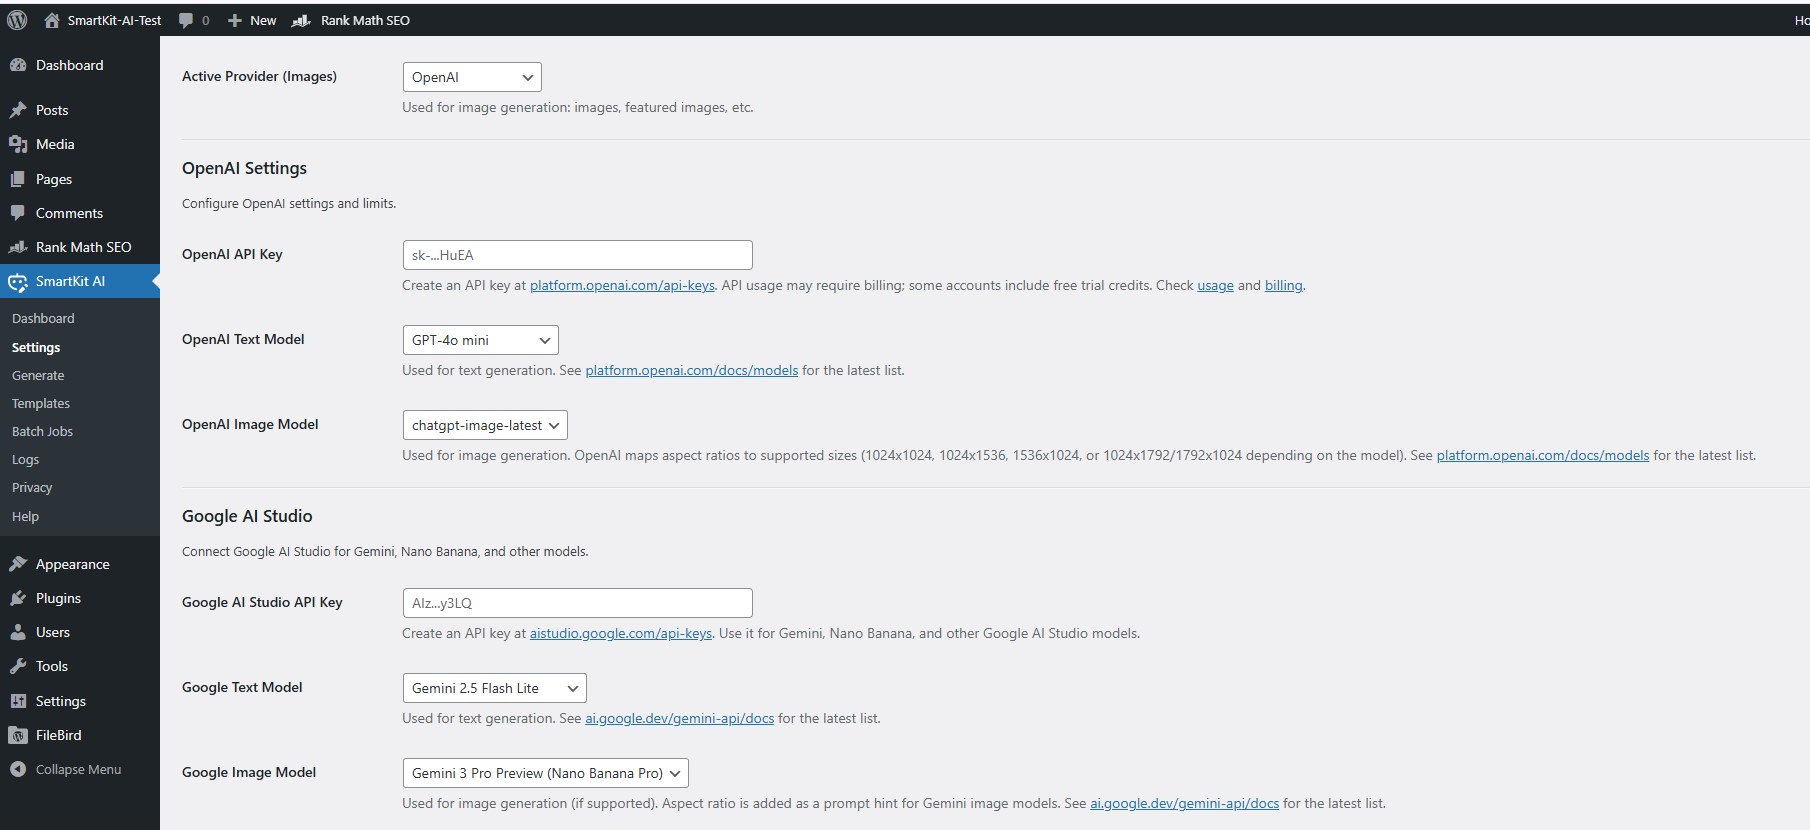
Active Providers
Pick which provider handles text generation and which handles image generation.
Active Provider (Text): Select the provider used for text outputs, for example post content, product descriptions, excerpts, titles, SEO text, captions, and other written fields.
Active Provider (Images): Select the provider used for image outputs, for example generating content images, featured images, image variations, and image-related fields like alt text, captions, and descriptions.
On some screens, such as Batch Jobs, you can also choose the provider per job, so you can switch providers within the same workflow without changing the global settings.
Overview of Admin Pages
SmartKit AI adds a set of admin pages in your WordPress dashboard to manage AI providers, configure generation settings, run single or batch generation tasks, and review results. These pages are designed to keep the full workflow in one place, from connecting your API keys and choosing providers for text and images, to generating content for posts or media, monitoring batch jobs, and checking logs for troubleshooting.
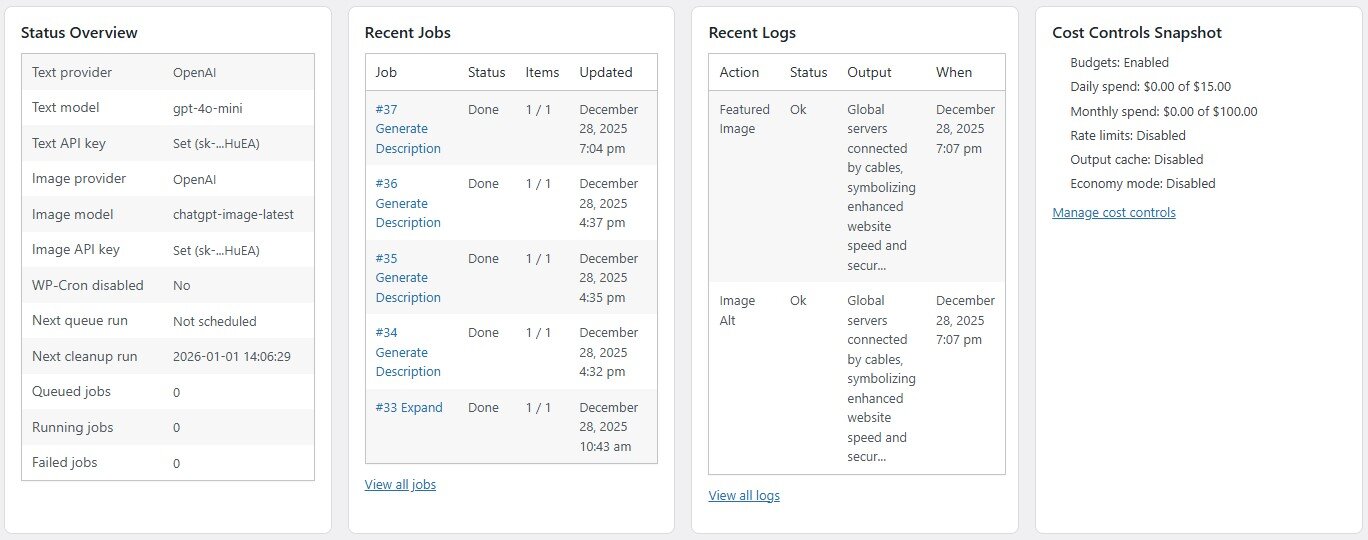
SmartKit AI Dashboard
A quick summary and launch point. It shows quick actions for common tasks, the status of your AI providers (so you know your API connections are working), any active batch job queue status, recent AI generation jobs or logs, and a snapshot of your cost/budget usage. This is the home base for monitoring AI usage at a glance.
How to Use SmartKit AI
Text Generation in Gutenberg & Classic Editor
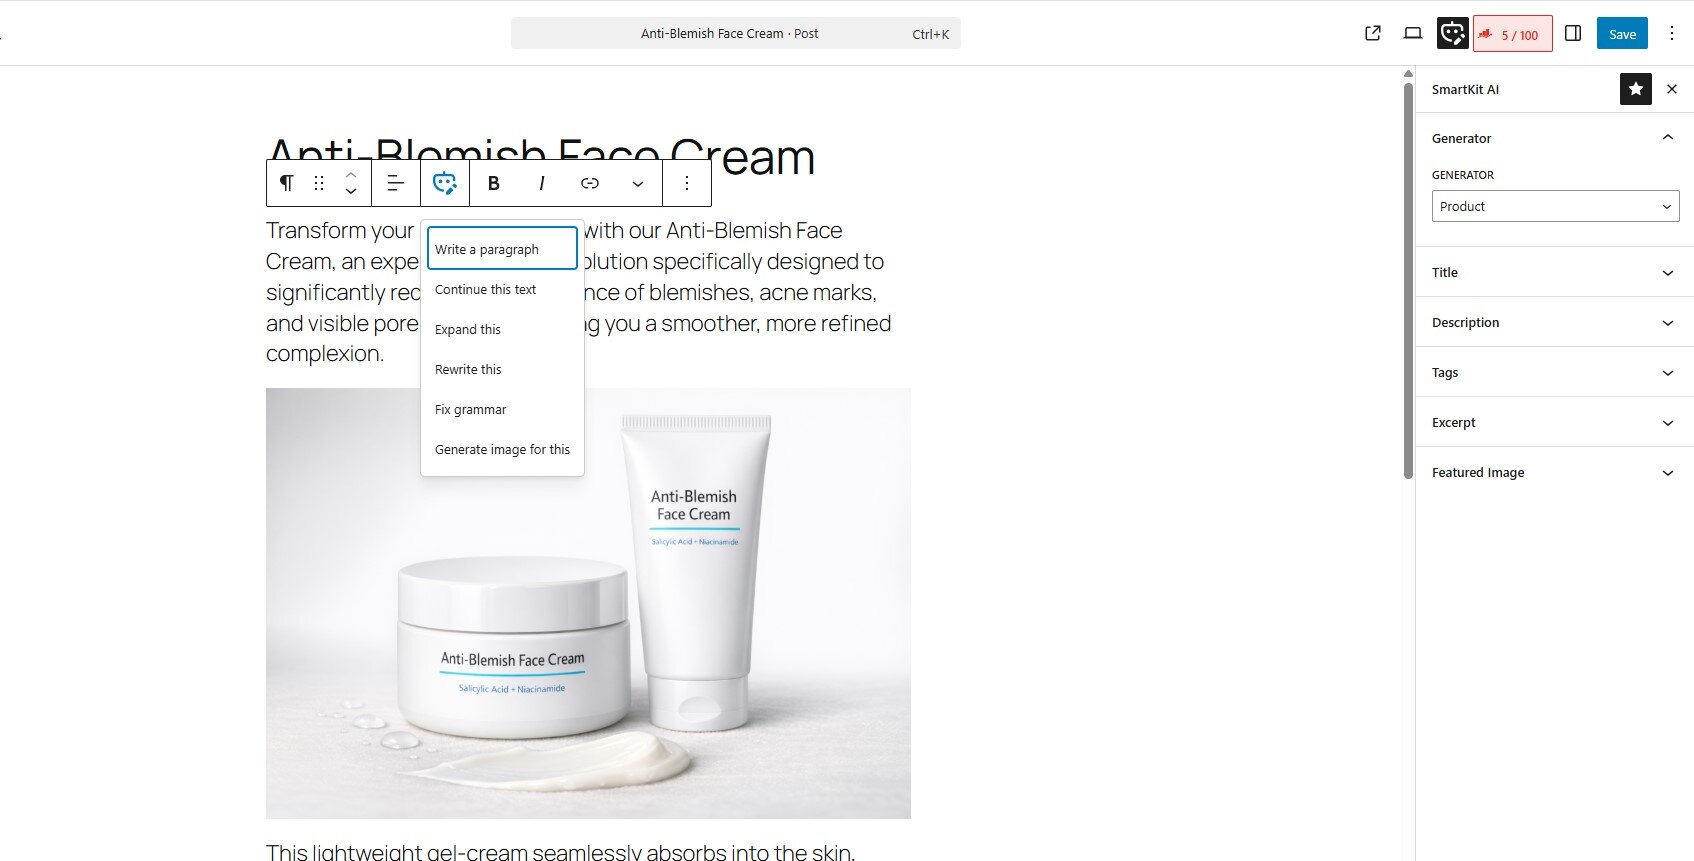
In the Block Editor (Gutenberg): SmartKit AI integrates directly into the Gutenberg editor for posts/pages. When editing content, open the SmartKit AI sidebar (look for the SmartKit AI icon in the editor toolbar or sidebar). This sidebar provides one-click AI actions for various fields – for example, buttons to Generate Title, Generate Excerpt, Write SEO Description, etc., which will use AI to fill in those fields. You can also use block-level AI actions: select a paragraph or block of text, and in the block’s toolbar you’ll see options like “Write” (have AI generate content in an empty block), “Continue” (extend the current text), “Expand” (elaborate on selected text), “Rewrite” (paraphrase the selection), “Fix Grammar”, or “Generate Image” (for image blocks). These contextual tools let you apply AI exactly where you need it in your content.
After the AI generates text, you can review it. If you’re not happy with the result, you can always undo or edit it – SmartKit AI stores the previous content so you can revert changes if needed (via the plugin’s undo feature or even the editor’s undo). The generated text can be inserted as new content or appended to existing content depending on the action used. Be sure to proofread AI outputs to ensure they fit your post’s tone and context.
In the Classic Editor: If you’re using the Classic Editor plugin or another legacy content screen, SmartKit AI provides a meta box below the content area. In this SmartKit AI meta box, you can enter a prompt or select a template, then click a Generate button to produce text. For example, you might choose a template like “Post Summary” and generate a summary for your article. The AI’s output will be inserted into the content (or other target field you select). The classic editor integration is simpler than Gutenberg’s (no inline block toolbar actions), but you still get the core functionality: the ability to generate or improve content with AI without leaving the editor. As with Gutenberg, always review the AI’s output and use the undo function if you want to revert to your original text.
Image Generation & Usage
SmartKit AI can generate images via AI and add them to your Media Library automatically. There are a couple of ways to create images:
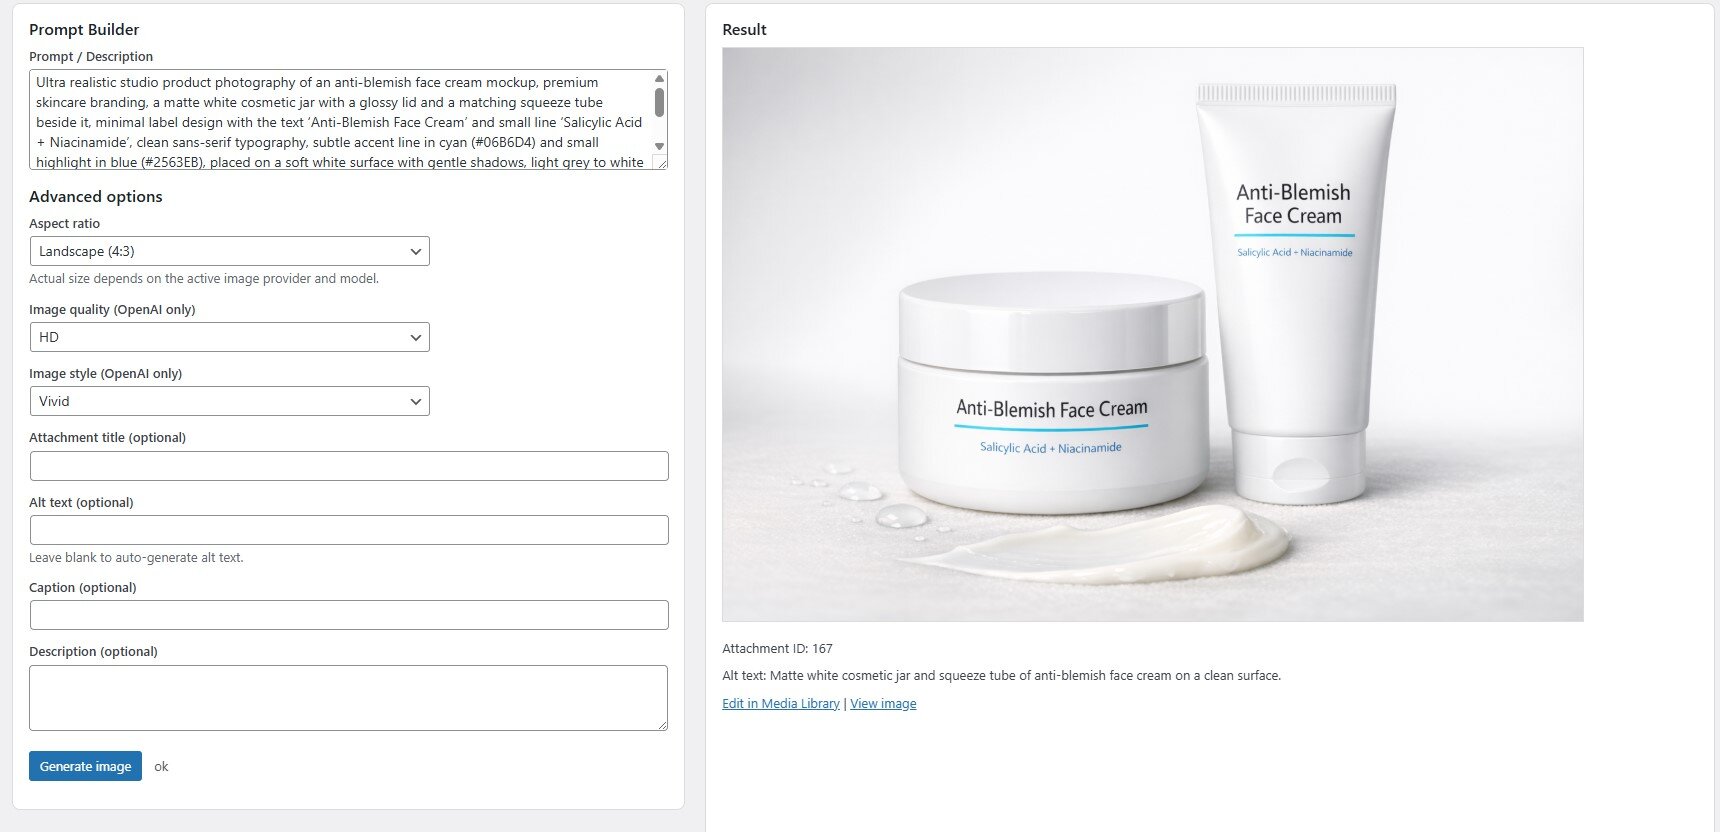
Using the Generate Page (Images Tab): Navigate to SmartKit AI → Generate and switch to the Image Generator tab. Here you’ll find options to describe the image you want, choose an aspect ratio or size, and possibly style settings (depending on provider capabilities). Enter a prompt describing the desired image (for example, “a professional 2D flat illustration of a rocket ship”) and click the Generate Image button. The plugin will send the request to the AI provider and, if successful, the new image will appear in a preview. The generated image is saved to the Media Library automatically. From there, you can download it or insert it into a post. If you generated the image while editing a post (for example, via the block editor’s “Generate Image” action or via Media → SmartKit AI Images), you can directly set it as the post’s featured image or place it in content. All images created by the plugin are stored just like any uploaded image, so you can find them in Media → Library.
Using the Media Library interface: Go to Media → SmartKit AI Images. This opens the same generation interface where you can quickly create a new image without going through a post. It’s convenient if you just need to make some graphics. After generation, you might want to add details to the image (like alt text or caption) – which you can do manually or by using the plugin’s auto-caption feature (see below).
Using Generated Images: Once an AI image is in your library, you can use it like any other image: insert it into posts/pages, set it as a featured image, or use it in product galleries, etc. The plugin can also automatically set a generated image as the featured image of a post if you trigger the generation from the post context (for example, using the “Generate Featured Image” option in the Gutenberg sidebar). All generated images are validated and saved in PNG format by default, ensuring they meet WordPress’s requirements.

Using Prompt Templates
SmartKit AI’s Prompt Templates let you create re-usable prompts for various purposes. Templates save you time by predefining the prompt wording, tone, and target field for AI output. To manage templates, go to SmartKit AI → Templates.
Creating a Template: Click “Add New Template” and give your template a name (and optional category for organization). Define the prompt text using placeholders for dynamic values – e.g., “Write a short summary for {title}” where
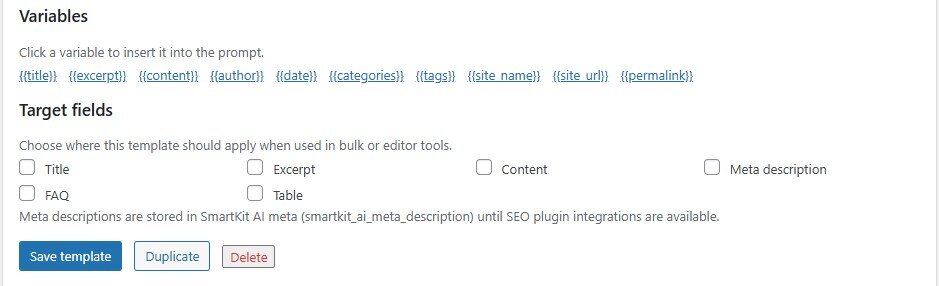
{title}is a variable. Select the target field that this prompt is meant for (such as Title, Excerpt, Content, Meta Description, etc.). Set any default tone, audience, length, or format instructions if needed. You can also provide example inputs or notes in the template description. Save the template. It will now be available to use on the Generate page or in batch jobs.
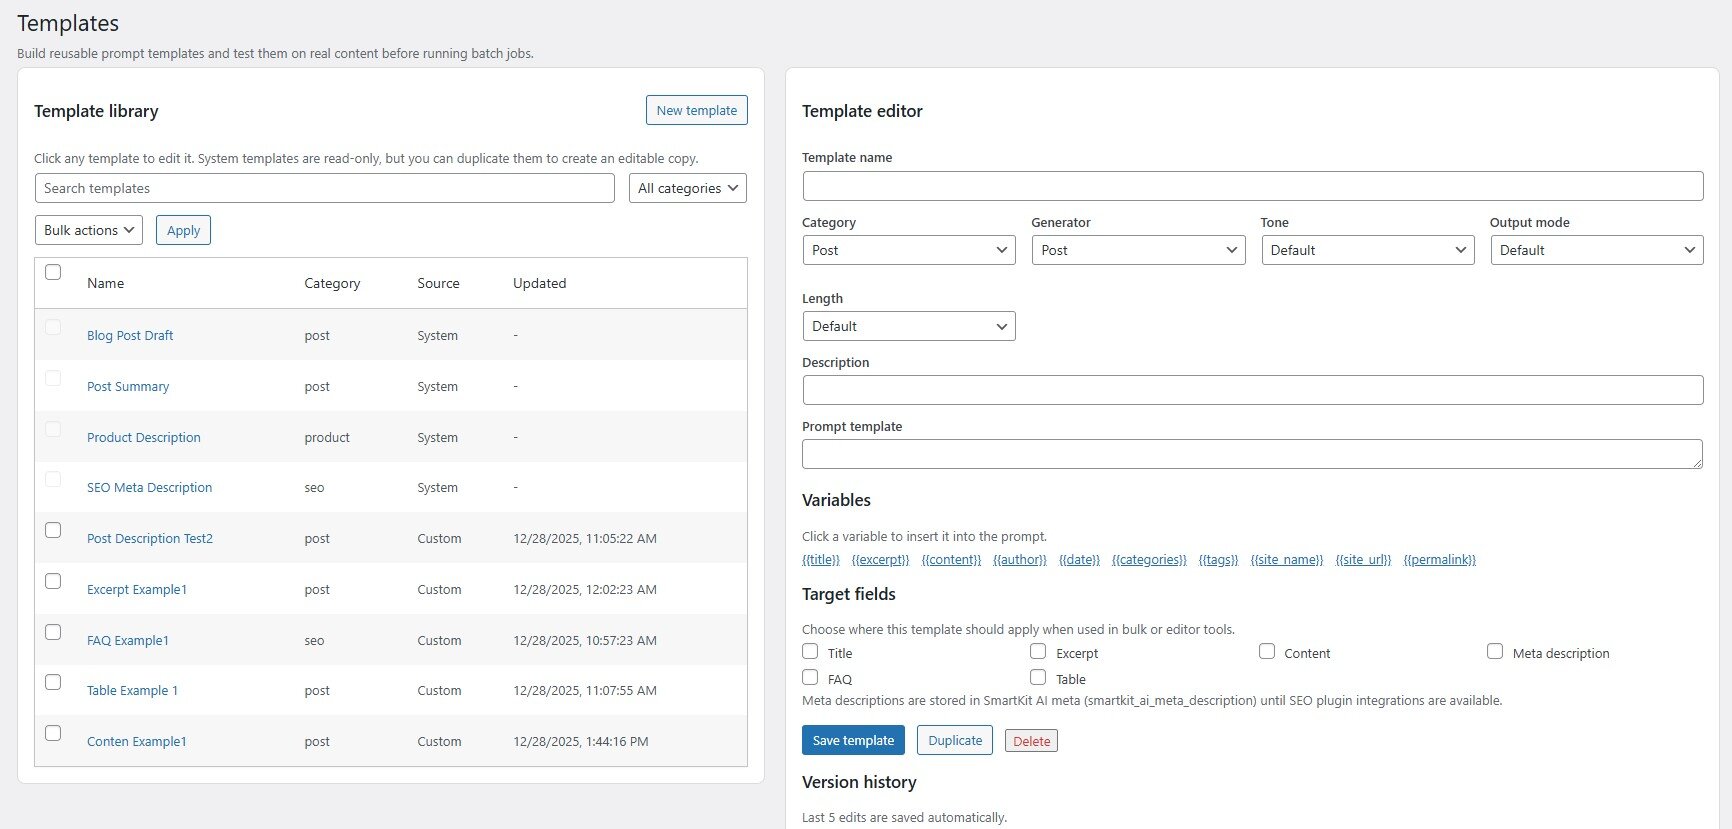
Template Variables: SmartKit AI templates support placeholders that automatically insert content from your posts. For example, you can use variables like
{title},{excerpt},{content},{author},{date},{categories},{tags},{site_name},{site_url}, and{permalink}. When you use the template on a specific post, those placeholders will be replaced with the post’s actual title, author name, etc. This makes templates highly flexible – one template can adapt to many different posts.Targets: Each template is designed to generate a certain type of output, known as the target. Common targets include: Title, Excerpt, Content (body), Meta Description (for SEO), FAQ (list of Q&A), or even Table (if your prompt is supposed to produce tabular content). The target essentially tells the plugin what field or format the output will be applied to. For example, a template with target “Meta Description” will know to place the AI output into the SEO meta description field (if integrated with an SEO plugin or custom field).
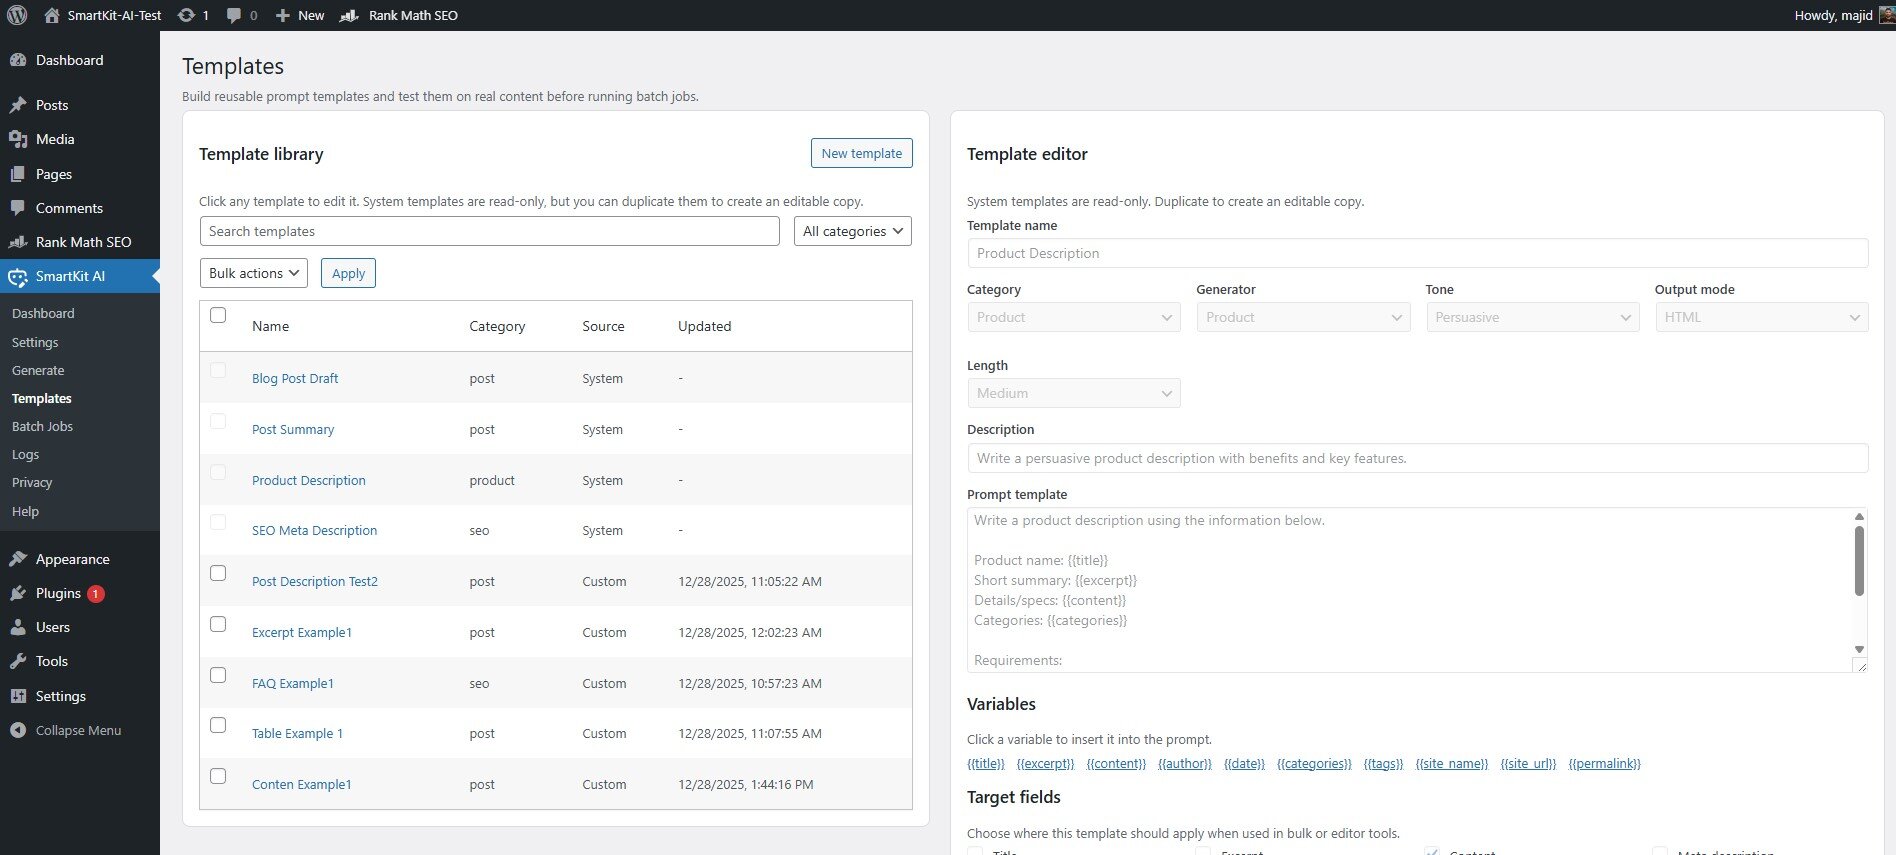
Using Templates for Generation: On the Generate page, you can select any of your templates from a dropdown. This will auto-fill the prompt builder with the template’s content and settings. You can adjust the prompt or settings if needed, then hit Generate to get the output. This is much faster than writing a fresh prompt each time. In the post editor, templates might also be available (for instance, in the SmartKit AI sidebar, you might apply a template to generate an excerpt). In Batch Jobs, you must choose a template to run across multiple posts – so designing good templates is key for bulk operations.

Managing Templates: The Templates page lists all your custom templates, as well as built-in system templates that come with the plugin. System templates (like “Post Draft”, “Post Summary”, “Product Description”, “SEO Meta Description”) are provided as examples and are read-only. You can view them and use them, but not edit them. For your own templates, the plugin keeps a version history of the last 5 changes, so you can revert to an earlier version if needed. You can duplicate a template (useful for creating a variation) or delete templates in bulk if they are no longer needed. Tip: use categories to organize templates (e.g., “Blog Posts”, “Products”, “SEO”) once you have many, so you can filter them easily.
Creating and Managing Batch Jobs
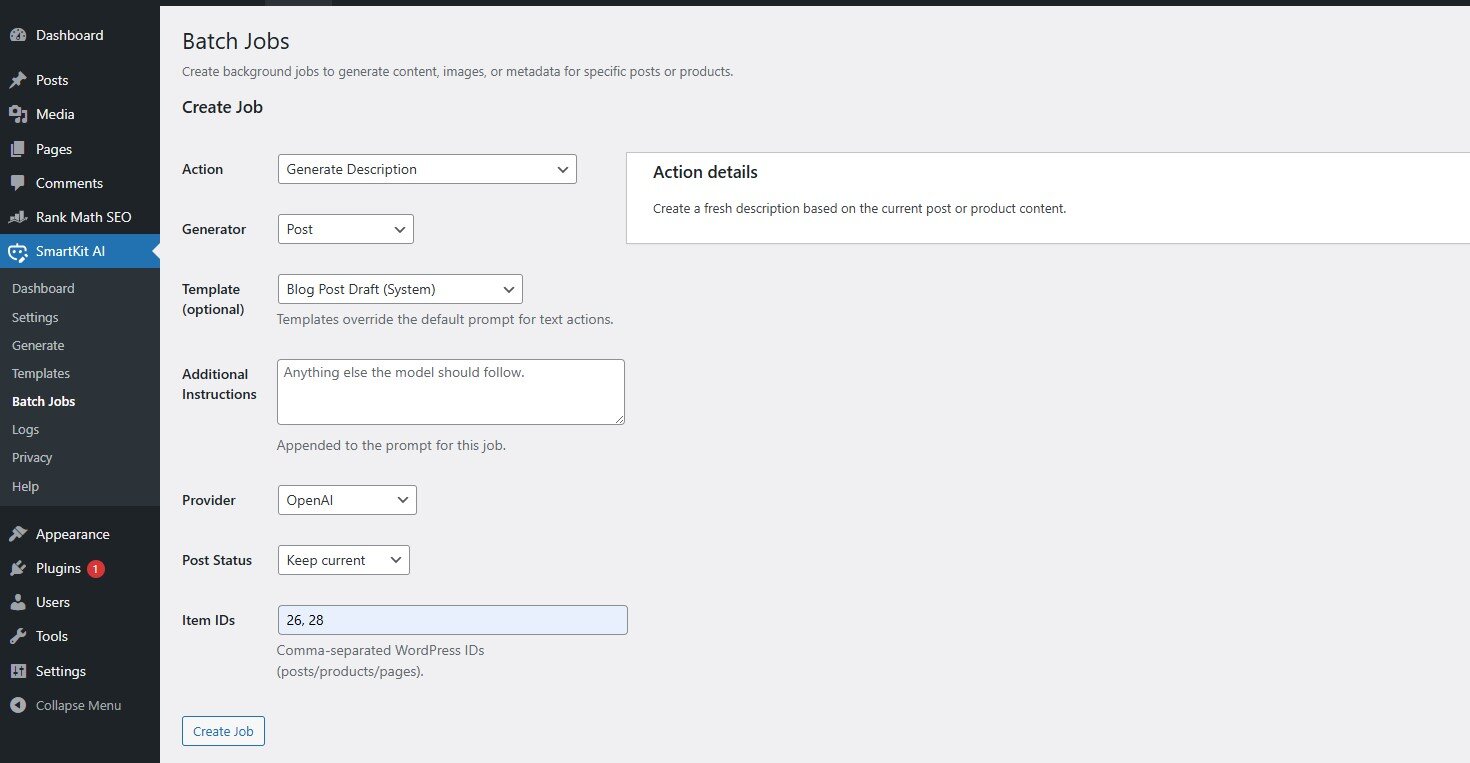
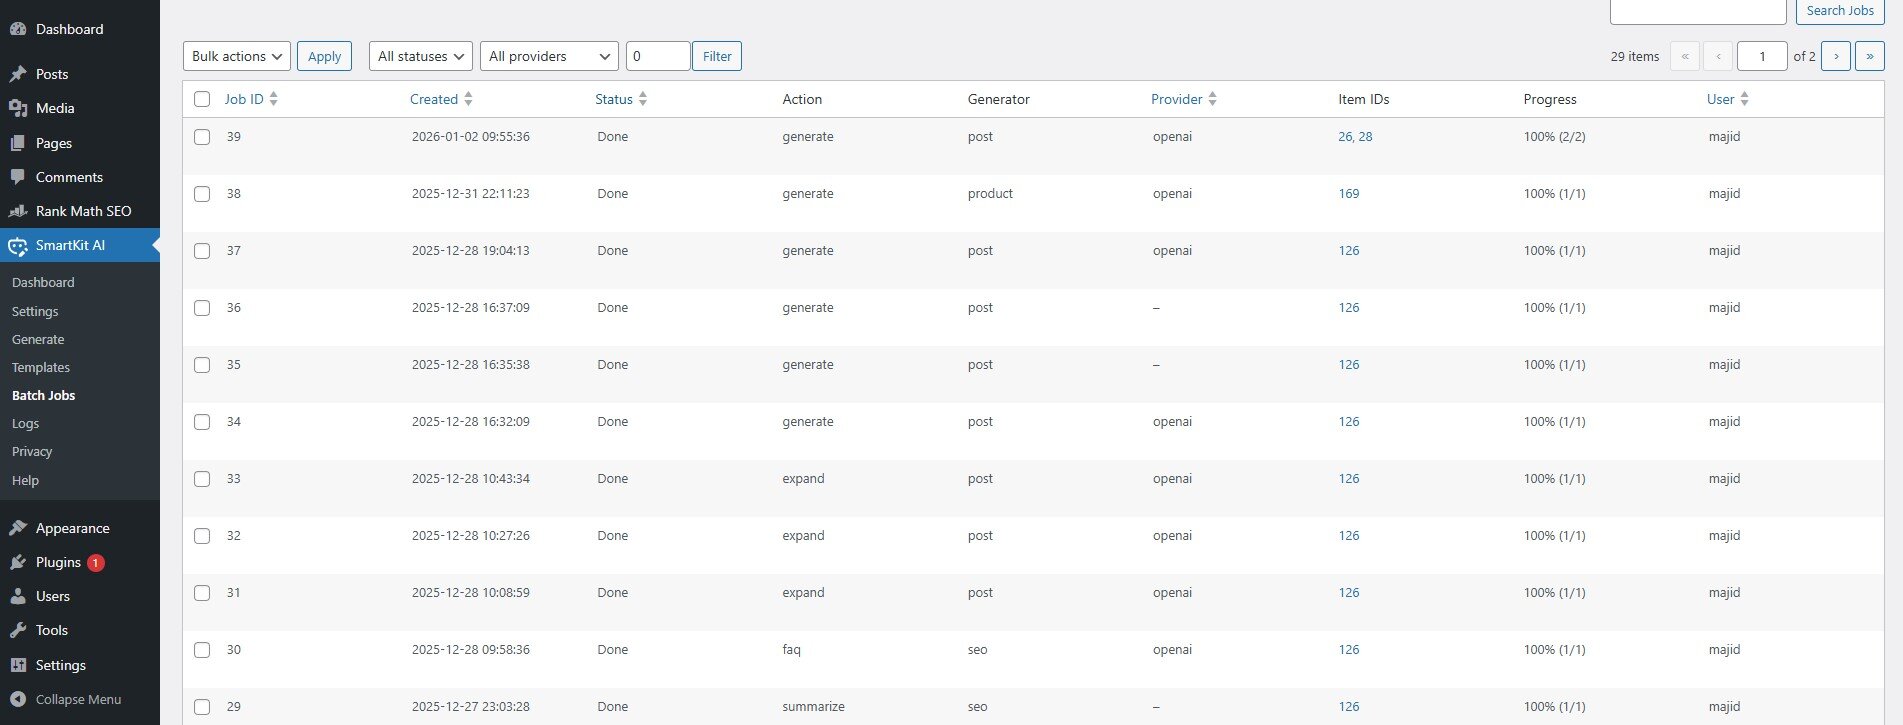
Batch Jobs allow you to apply AI generation to many items (posts, pages, etc.) in one go – a huge time-saver for bulk tasks. To create a batch job, go to SmartKit AI → Batch Jobs.
Creating a Job: Provide a name for the job (e.g., “Generate Excerpts for All Drafts”). Select the target template or generation type you want to run. For example, choose a prompt template you created (like an Excerpt generator template) or a built-in action. Then, you will select the set of posts or items to run this on. The interface allows filtering by post type, category, status, etc., or you can manually pick specific items for the queue. Once configured, save or start the job. The job will queue up all the selected items for processing.
Job Processing: SmartKit AI processes batch jobs in the background using WordPress Cron (WP-Cron). The job will begin executing each item one by one, using the AI to generate the content for the target field (e.g., generating an excerpt for each post). You can watch the progress on the Batch Jobs page – items will move from Queued to Running to Done. If your site doesn’t trigger WP-Cron regularly (some hosts disable automatic Cron), you might need to run a server cron or visit your site periodically to advance the queue. You can also manually pause a job if you need to stop it, and resume it later.
Reviewing Outputs: Once a batch job completes (or even as it’s running), you can review the AI outputs for each item. The job details page will list each post/item with its original content and the AI-generated content side by side (for fields like content or excerpt). Use the Review function to compare before vs. after for each item. If you’re satisfied with the output, great – if not, you have options to Undo the change, which will revert that item back to its original text. The plugin takes a snapshot of original fields before applying AI, so undo is safe and easy. You can undo individual items or even revert an entire job’s changes if needed.
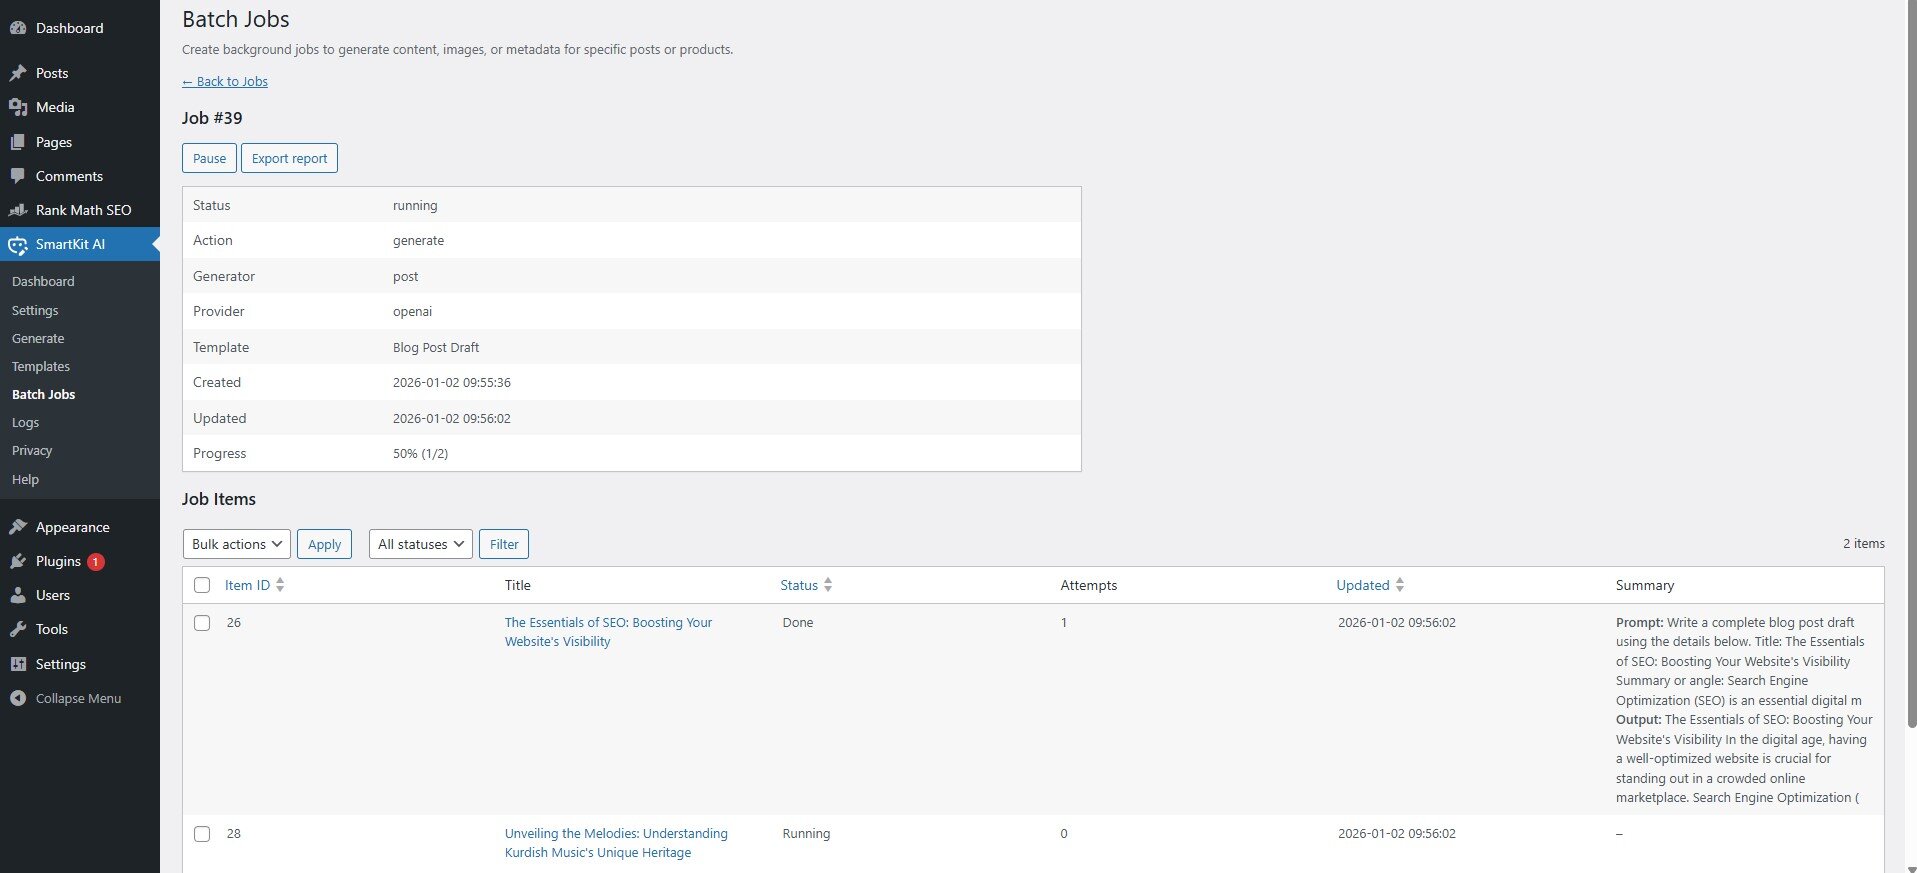
Managing Jobs: After running a job, you’ll see it listed in the Batch Jobs overview with a status (Queued, Running, Paused, Done, Failed, or Blocked). “Blocked” means some items weren’t processed due to cost or rate limits (see Cost Controls). You can click on a job to view details and logs. For any failed or blocked items, you can attempt to Retry them (for example, after adjusting settings or budget). Completed jobs can be exported – use the Export to CSV feature to download a spreadsheet of results, including outputs, token usage, and cost estimates for each item. This is useful for record-keeping or analyzing the AI’s performance. When jobs are no longer needed, you may delete them to clean up. Old jobs and their logs can also be automatically purged based on retention settings (see Privacy Settings).
Reviewing and Undoing AI Outputs
SmartKit AI is designed to let you safely experiment with AI content, so it provides ways to review and revert changes:
Preview Before Applying: In many cases, the plugin shows you the AI-generated text in a preview or input field before you finalize it. For example, on the Generate page’s text tab, the AI output might appear in a preview box where you can copy or insert it into the editor when ready. This lets you tweak or decide not to use it before it goes live.
Before/After Comparison: For batch jobs (and some single-generation actions), SmartKit AI stores the original content and the new AI content. The Batch Jobs review interface specifically highlights the before vs. after difference for each generated field. Take advantage of this to ensure the AI’s output is acceptable.
Undo Functionality: If an AI generation overwrote something and you want to restore the original, you can undo it. In batch jobs, each item has an Undo button to restore the prior content. Even outside of batch jobs, the plugin keeps a snapshot of fields it changes (for example, if you replace a post’s content via the Generate page or editor integration). You might find an “Undo AI Output” link or option in the interface if a change was made, or you can manually retrieve the previous content from the Logs (the log entry stores prompt and output, and the plugin also saves previous values in custom fields for safety). The key point: you won’t lose your original content – it’s recoverable as long as you act before those snapshots are cleaned (per retention settings).
Partial Acceptance: You don’t always have to undo completely. You could also copy part of the AI’s output and combine it with your original writing, then save. The plugin’s role is to assist, but you remain in control of the final content.
By reviewing and undoing when necessary, you can ensure that only high-quality AI-generated content remains on your site.
Using the Auto Alt/Caption Generator (Media Library)
Writing descriptive alt text and captions for images can be tedious – SmartKit AI can do it for you. When you’re in the Media Library, either in list view or editing a single image, you’ll see a SmartKit AI meta box for the attachment. This tool will generate an Alternative Text (alt tag), Caption, and Description for your image automatically.
How to Use Auto-Generate: Edit an image (for example, click Edit more details on an image in the Media Library). In the SmartKit AI meta box, you might find an optional field to input additional instructions or context (e.g., “This image is a portrait of a group at sunset” – context helps the AI). Then click the Generate Metadata button (the actual button might be labeled “Generate” or similar). The plugin will send a request to the text AI provider to create suitable text for each field. In a few seconds, it will fill in the Alt Text, Caption, and Description fields for you – describing the image content in a sensible way. For example, it might produce alt text like “A group of people standing at sunset on a beach,” and a slightly longer description for the caption.
Review the generated text and adjust if needed (especially ensure the alt text is accurate to the image; since the AI doesn’t actually see the image, it relies on any hints from filename or your instructions). Once satisfied, save the attachment. Now your image has alt text and caption, which is great for accessibility and SEO. This feature is particularly useful if you have many images – you can quickly generate descriptions instead of writing them all by hand.
Review the generated text and adjust if needed (especially ensure the alt text is accurate to the image; since the AI doesn’t actually see the image, it relies on any hints from filename or your instructions). Once satisfied, save the attachment. Now your image has alt text and caption, which is great for accessibility and SEO. This feature is particularly useful if you have many images – you can quickly generate descriptions instead of writing them all by hand.
Settings Guide
The Settings page for SmartKit AI is where you configure how the AI features work. Access it via SmartKit AI → Settings. Settings are divided into sections for providers, defaults, cost controls, and privacy. We’ll go through each:
Provider API Configuration
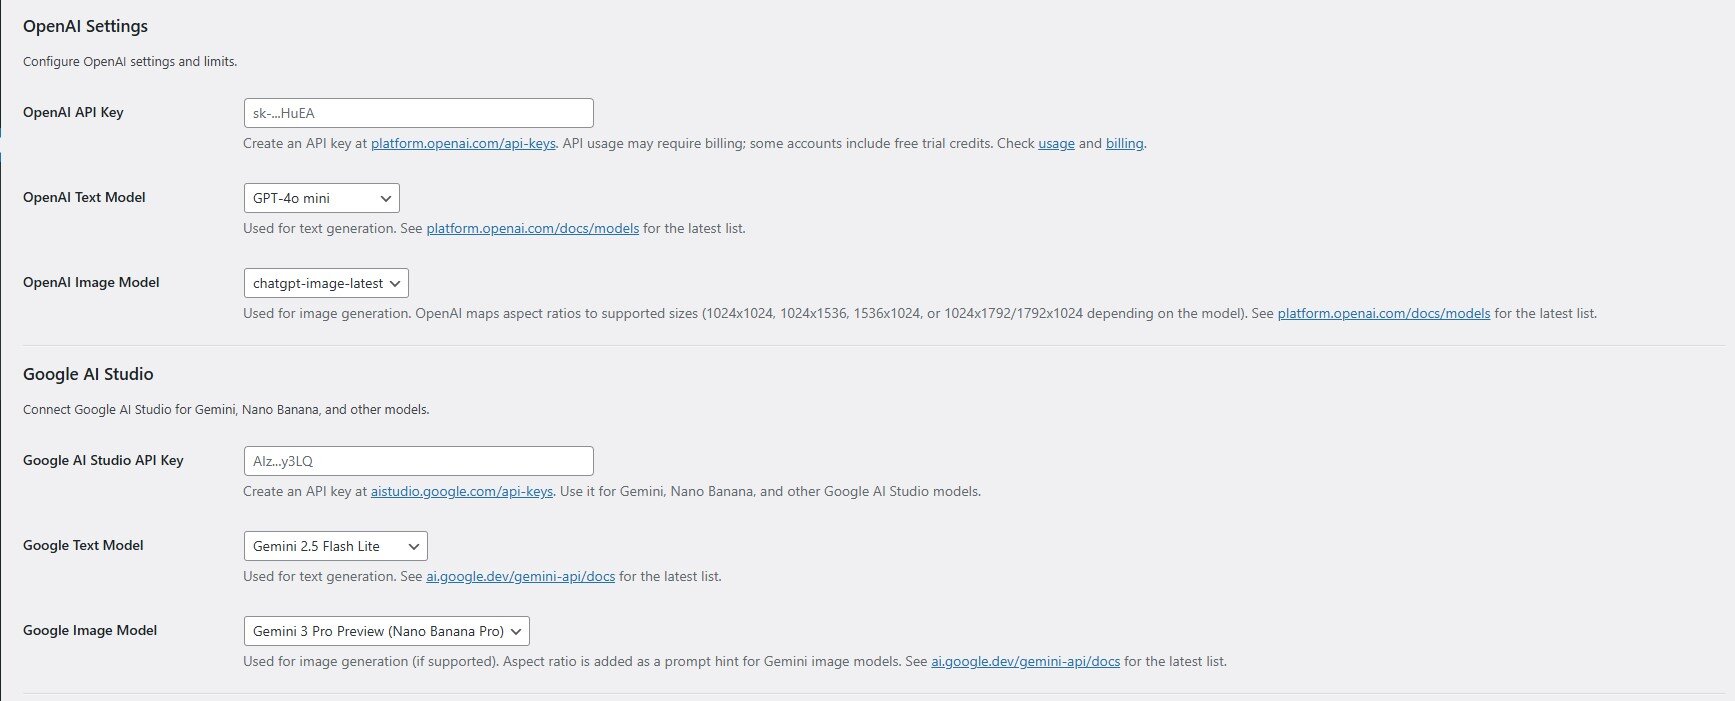
Under Settings → Providers, you set up your AI provider details. You should see options for OpenAI and Google AI Studio:
API Keys: Enter the secret API keys you obtained from OpenAI or Google. Without a valid API key, the plugin cannot send requests to the AI service (you’ll get errors if you try). Make sure to click Save Changes after entering the keys. If both providers are configured, you can use either one in the plugin.
Model Selection: Depending on the provider, you may have options to choose which AI model or endpoint to use for text and for image generation. For example, OpenAI might list models like
gpt-4orgpt-3.5-turbofor text, andDALL-Efor images, while Google might list their model choices (such as PaLM or Imagen if available). Choose the models that make sense for your use case (note that more advanced models may cost more or have different capabilities).Active Provider for Each Task: Decide which provider is active for text generation and which for image generation. You might set OpenAI as the default for text and Google for images, or just use one provider for both. The plugin will use the designated provider when you trigger any generation. You can switch this anytime if needed (for instance, if you run out of budget on one, switch to the other).
Test Connection: The Help page offers “Test” button to verify your API keys and connectivity. It’s a good idea to run this test – the plugin will attempt a simple request (like listing models or a small generation) to confirm that your setup works. If the test fails, double-check your API key and ensure your server can reach the provider’s API.
Budget and Cost Limits (Cost Controls)
AI API usage can incur costs, so SmartKit AI provides Cost Controls to help manage and limit usage. These settings are typically under Settings → Cost Controls (or a section on the settings page):
Daily and Monthly Budgets: You can set a daily spending limit and a monthly spending limit (in USD, for example) for AI usage. The plugin will estimate the cost of each AI request (based on tokens for text or image generation unit costs) and keep a running tally. If a limit is reached, further generations will be blocked for the remainder of that period. This prevents accidental overuse. You can also override budgets per user role – for instance, give admins a higher budget than authors.
Rate Limits: To avoid excessive use, you can configure rate limits such as requests per hour per user or per day. For example, you might allow at most 5 generations per user per hour. If a user hits the rate limit, the plugin will temporarily block additional requests for them until the window resets. This ensures fairness and prevents abuse or mistakes (like someone hitting generate repeatedly).
Economy Mode: When enabled, Economy Mode will automatically adjust generation settings to reduce cost – for example, by using shorter max tokens, lower image resolution or quality, or a higher “creativity” penalty to reduce length, etc.. Essentially, it makes the AI responses more concise or uses cheaper models. This mode is useful if you’re on a tight budget or nearing a limit; it helps stretch your remaining budget.
Output Caching: SmartKit AI can cache AI responses for identical prompts to save cost. If caching is enabled, when you ask the same exact prompt again, the plugin can reuse the previous result (stored temporarily) instead of calling the API again. In settings, you can set the cache duration (TTL) for text outputs. This is especially handy during testing or if multiple users might coincidentally ask the same thing – it avoids paying twice for the same answer. (Note: Only text generation is cached; images are typically unique every time, so those aren’t cached by the plugin.)
Cost Visibility: The plugin calculates an estimated cost for each request based on the provider’s pricing. You’ll see this in logs and possibly in the interface after generation. There’s no direct setting for this, but be aware that costs shown are estimates. Always check your actual provider account for billing.
Output Settings (Tone, Format, and Defaults)
In Generate sections, you can configure the default behavior for generated content:
Default Tone and Style: Set the default tone (e.g. formal, conversational, enthusiastic) and audience or reading level if applicable. This tone will apply to generations unless you specify otherwise in a prompt. For instance, you might set the default tone to “professional” so that most outputs sound professional unless overridden.
Default Length: You can define what a “short”, “medium”, or “long” output means in terms of word or token count, or simply set a default length. The plugin may have a dropdown on the prompt builder for length, which you can preset (e.g., default to Medium).
Default Language: If you want all outputs in a certain language (e.g., English by default), set it here. Otherwise, the plugin might use the site language or infer from context. There may be an option to always append “in English” or another language to prompts automatically, based on this setting.
Output Format: Choose the format of AI output text – HTML, Plain Text, or Markdown. By default, HTML is often used so that formatting (like headings or lists) is directly usable in WordPress. If you prefer raw text or markdown (which the plugin can convert to HTML), you can change this setting. For example, if you set output to “Markdown”, the AI might return markdown syntax which the plugin will then convert to HTML for insertion. Choose what fits your workflow.
Append/Replace Mode: When the AI generates content for a field that already has content, you can decide if it should replace the existing content or append to it. For instance, generating an excerpt could overwrite the old excerpt or just add to it. This might be a per-use choice, but there could be a default setting in the plugin. Check the settings for anything like “Default Insertion Mode”.
Auto-Save Drafts: One setting to look for – whether AI changes are auto-saved. Some users prefer that any AI insertion updates the post immediately (as a draft), others might want to manually review then save. The plugin might have a toggle for auto-saving after generation. Configure according to your preference.
These default settings help streamline the generation process so you don’t have to set common options every time. You can always override them for a specific generation on the fly, but having sensible defaults (tone, language, etc.) that match your site’s voice will make using SmartKit AI faster.
Privacy Settings and Data Cleanup
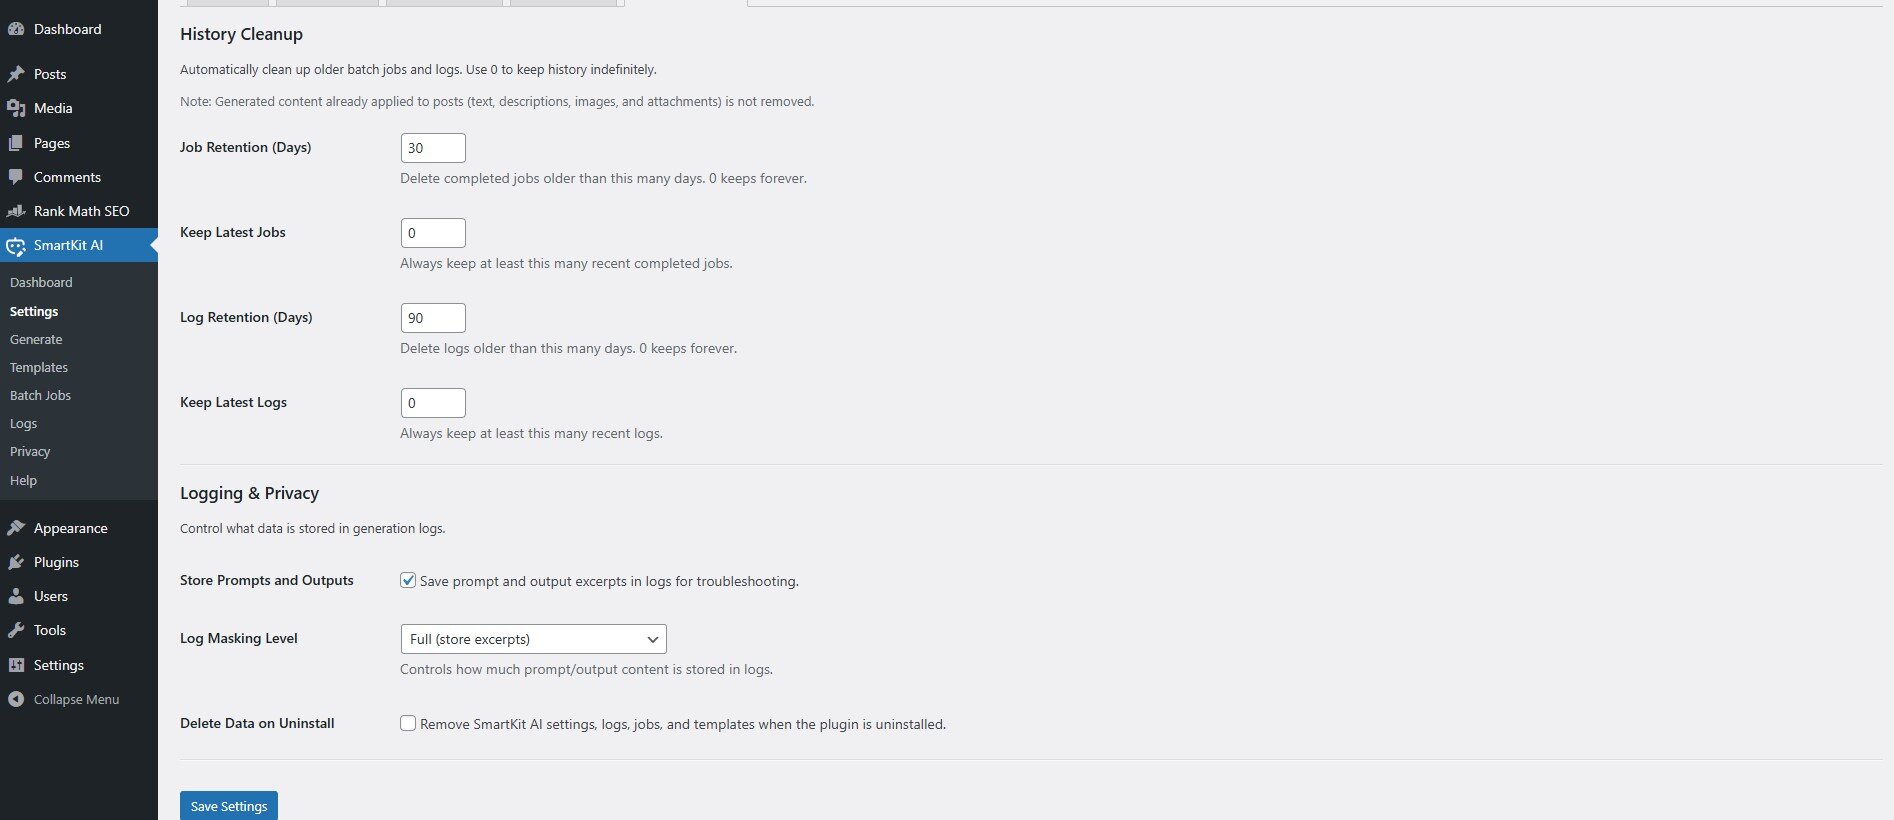
AI generation can involve sensitive content, so SmartKit AI gives you control over data handling. In SmartKit AI → Setting → History Cleanup :
Masking of Logs: You can choose how much detail the plugin stores in the logs about your content. Options usually include Full (store the complete prompt and AI output), Partial/Redacted (store some info but redact sensitive parts or the bulk of content), or None (don’t store the content at all, just store that something happened). If you’re concerned about sensitive data (like user info or proprietary text) being recorded, consider a partial or no-logging mode. Keep in mind, disabling logs means you won’t have records to review outputs later.
Retention Period: Set how long to keep logs and batch job records. For example, you might keep logs for 30 days and then have the plugin automatically delete older entries. This helps limit database bloat and protect older data from lingering. Similarly, you can set how long to retain batch job details and the “undo” snapshots. Adjust these based on your needs (shorter if privacy is a big concern). The plugin’s cleanup routine will regularly purge data older than the set retention.
Delete Data on Uninstall: There is an option to completely remove SmartKit AI data if the plugin is deleted. If you enable this and later uninstall the plugin via WordPress, it will wipe its custom database tables (like the logs and job items) and options from your database. Enable this if you prefer a clean removal with no leftover data. If disabled, uninstalling will leave the data in case you re-install the plugin later (or for manual cleanup).
Personal Data and AI Providers: Remember that when you use the plugin, your prompts and content are sent to the AI provider’s servers for processing. The plugin itself doesn’t share data with anyone else, but OpenAI or Google will receive the text you send in prompts and possibly some context (like parts of your post content if included in the prompt). Be mindful of this and avoid sending highly sensitive personal data through the AI. Review the privacy policies of your chosen provider to understand how they use the data. SmartKit AI’s role is to facilitate the requests, but you control what content you send.
By configuring these privacy settings, you can balance the functionality with your site’s privacy requirements and ensure data is handled appropriately.
Help & Troubleshooting
If you encounter issues or have questions, SmartKit AI provides a Help page and some common troubleshooting steps:
Help Page Diagnostics: In SmartKit AI → Help, you can run tests to ensure everything is set up correctly. Use the Provider Connection Test to verify your API keys are valid – the plugin will report if it can successfully connect to OpenAI or Google AI. The Help page also shows your server info, WordPress version, and plugin version, which can be useful when seeking support. You can download a Support Report from here, which contains all relevant system info and plugin settings – handy for debugging or when contacting the developer.